A Guide to the Crawl Space Waterproofing Process
Are you considering waterproofing the crawl space in your home? Crawl spaces such as the basement are often wet, dark, and moldy. They make up great spaces for mold growth and pest habitats.
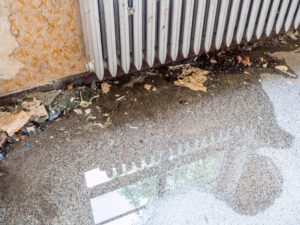
If your crawl space is a natural breeding space for mold and other contaminants, the integrity of your home might be affected. These conditions can also compromise your HVAC unit by destroying the mechanical components of the water heater and the AC. They can also lead to indoor air quality problems.
The only way to protect your household is through crawl space waterproofing. So what is the crawl space waterproofing process, and how can you prepare your home?
Below is a comprehensive guide to help you through the waterproofing process:
Start by Examining the Property
The waterproofing process should start with a thorough inspection of your home’s layout and the crawlspace. It’s an added advantage if you have a floor plan for your house to create a proper method of approach. The next step is ensuring that the house is correctly graded.
If you suspect that the house has any grading or drainage issues, contact a professional to check the problem and fix it. You also need to check for pest infestation and mold growth before waterproofing. Ensure to clear any molds and mildew and disinfect the area to get rid of any remaining mold spores.
Check your water heater and furnace for any gas or water leaks. Leaking gas could result in a future backdraft.
Clean the Area and Remove All Debris
Most crawlspaces don’t have proper flooring. They are often made up of dirt and other materials lying under your home. For this reason, home contractors often place a vapor barrier between the house and the ground during the construction period.
A vapor barrier is simply a plastic sheet liner placed on your crawl space to protect your home. The liner isn’t attached to anything on the ground. It’s placed as a barrier to block out any vapors and odors coming from the earth.
Unfortunately, this physical barrier often deteriorates and wears off with time. Contractors may also shift it around during repair projects, making it less effective in protecting your home. Within 5-10 years, your vapor barrier will likely lose its functionality, calling for a new installation.
Before installing a new vapor barrier, you need to remove the old one and sweep away debris and particles. Remove any obstacles from the area before installing water drainage.
Repair the Crawl Space
After removing everything from the crawlspace, the next step is to repair any structural damages to the space. Check all structural elements and ensure everything is alright. This process often involves removing ant rotten wood and replacing it.
Ensure you get the floor joists, rafters, and band joists in place. You should also check the subfloor for any signs of rotting. If there are any rotten woods, ensure you also replace them before continuing the project.
When removing old, worn-out, and rotten wood boards from the floor, ensure you compensate for the initial support they offered. The last thing you want is your subfloor collapsing because it lacks any support.
Seal the Outdoor Spaces and Vents
After cleaning the area and replacing any rotting wood, it’s time to start the actual work. This step involves sealing all vents to the crawlspace completely. You should also seal any gaps on the floor to protect your crawlspace from moisture build-up.
Use hydraulic cement and vent covers to ensure no air enters the area. Don’t forget to seal the door too. It’s advisable to use form boards to insulate the crawl space’s walls and fiberglass batts to insulate its floors.
Install the New Moisture Barrier
Before installing a new moisture barrier, you need to get rid of the existing one to make room.
After removing the old barrier, ensure you level the ground to make it easier to install the new barrier. Install the new vapor barrier immediately after removing the old barrier to prevent any moisture from entering the crawl space and damaging your property.
You may notice a musky odor coming from the ground in the process. Keep in mind that moisture is responsible for that and works fast. Follow the below steps to install the new vapor barrier from your crawl space:
- Wrap all the piers with the moisture barrier sheet
- Ensure the piers is well fitted to the ground
- When you come across any obstacles ensure you cut the sheet tightly around them
- Use waterproof tape to tightly tape the sheet obstacles
- Cover the whole crawl space with the sheet and tape it properly to the wall
- Fold the poly’s corners so that it lays flat on the crawl space surface
During the installation, ensure the sheet seams overlap by a few inches. For maximum protection against moisture, consider installing a thermal barrier to prevent air from outside seeping into the crawl space. Consider using foam insulation to prevent outdoor air and moisture from slipping into the crawl space.
Completely Dry the Crawl Space
This is the final step in the crawl space waterproofing project. Before patting yourself on the back, you need to dry the space. You can do this by installing a dehumidifier.
The dehumidifier is your best option to ensure the crawlspace has little to no moisture levels all around the year. You should also get a humidity monitor to measure and monitor the space all year round. The humidity monitor will also help you measure the efficiency of your crawl space waterproofing.
Crawl Space Waterproofing Near Me
Crawl space waterproofing gives you peace of mind that your property is well protected against moisture and vapor from the ground. Now that you understand the steps that go into crawl space waterproofing ensure you use all the information you learned to your advantage.
Are you thinking about waterproofing your crawl space? If so, contact us at Sedona Waterproofing Solutions, and we will handle all your waterproofing needs.
Learn more about Sedona Waterproofing Solutions.