The Dos and Don’ts of Installing a Vapor Barrier in Your Crawl Space

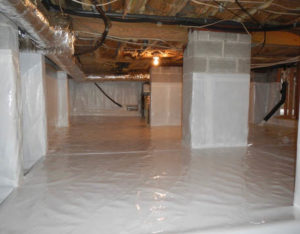
Installing a vapor barrier in your crawl space is an important step when it comes to protecting your home from moisture damage. It’s essential that the job be done correctly so that you can maximize the protection it provides. To help guide you through this process, we’ve put together a list of dos and don’ts for installing a vapor barrier in your crawl space.
Do Measure Your Space Before Buying Materials
Before you begin shopping for materials, make sure you measure the area where you will be installing your moisture barrier. This will ensure that you buy enough material to cover the entire area without having any extra left over. Also, keep in mind that different types of vapor barriers have different thicknesses and require different amounts of attachment materials such as staples or tape. Knowing the size of the area you need to cover can help ensure that you purchase the right amount of material for the job.
Do Choose The Right Type Of Vapor Barrier For Your Needs
The type of vapor barrier that will work best for your home depends on several factors, including your climate and local building codes. Generally speaking, there are three main types of vapor barriers—reinforced polyethylene sheets, asphalt-coated paper sheets, and asphalt-impregnated boards—and each type has its own advantages and disadvantages depending on what kind of protection you need. Be sure to research all three types before making a decision so that you choose one that is best suited to your needs.
Do Use A Black Vapor Barrier vs a Clear Barrier
Black or white vapor barriers are better than clear ones since they absorb heat, which creates a buffer zone between the warm air in your home and the cold air outside. This reduces condensation on surfaces, helping to protect against moisture damage. It’s also important to ensure that the barrier is completely sealed so that no moisture can get through it. Using staples or tape along all edges and seams will help create a strong seal.
Don’t Use A Thick Vapor Barrier In Hot Climates
In hot climates, thick vapor or moisture barriers can actually trap too much heat inside your crawl space instead of creating a buffer zone. This can lead to increased humidity levels and possible mold growth. For hotter climates, use thinner vapor barriers designed for warmer temperatures or look for barriers with ventilation holes to help reduce moisture buildup.
Don’t Forget To Seal The Edges Of The Vapor Barrier
Once you have installed your vapor barrier, make sure to seal all edges with either caulking or tape so that no air is able to escape around the edges. Doing this will not only enhance the protection provided by the vapor barrier but also prevent mold from forming due to trapped moisture within sealed areas of your crawl space. Additionally, it’s important to check these seals periodically (at least once every six months) to make sure they are still secure and doing their job properly.
Don’t Puncture the Plastic During Installation
When installing a vapor barrier, it’s important to take care not to puncture or tear it in any way. Even small tears can significantly weaken the barrier and reduce its effectiveness. If you do accidentally puncture the material, make sure to repair it immediately by either patching with tape or replacing the damaged section entirely.
Don’t Install a New Barrier Over Old Plastic
If your home already has a plastic vapor barrier installed, don’t just install a new one over the top of it. This will cause moisture to be trapped underneath and can lead to mold growth. Instead, remove the old plastic and check for any signs of damage before installing a fresh layer of material.
By following these tips and taking the time to ensure you have chosen the right type of vapor barrier for your needs, you can maximize the protection it provides. With proper installation and maintenance, your vapor barrier should help protect your crawl space from unwanted moisture for years to come.
Installing a vapor barrier in your crawl space can provide an effective way of preventing moisture build-up and protecting against water damage and mold growth. However, it’s important not to overlook any steps along the way if you want maximum protection! Make sure you measure your space first before buying materials; choose the right type of vapor barrier based on climate and local guidelines; and don’t forget to seal all edges with caulking or tape after installation. By following these simple tips, installing a quality vapor barrier can be both straightforward and effective!
Recent Posts
- How Crawl Space Encapsulation Benefits the Environment – An Expert Guide
- 6 Ways Professionals Keep Your Crawl Space in Top Shape
- Structural Repair Solutions for Crawl Spaces, Basements, and Foundations
- Essential Crawl Space Repair Tips Every Homeowner Should Know
- The Importance of Radon Mitigation: Ensuring a Safe Living Environment for Homeowners
Categories
- Basement Mold
- Basement Waterproof Foundation
- Basement Waterproofing
- Crawl Space Dehumidifier
- Crawl Space Encapsulation Cost
- Crawl Space Repair
- Crawl Space Waterproofing
- Encapsulation
- Foundation Repair
- Foundation Waterproofing
- French Drains
- Leaky Basement
- Mold Remediation
- Mold Removal
- Radon
- Slab Jacking
- Sump Pump
- Uncategorized
- Vapor Barrier
- Water Leak
- Waterproofing
- White Mold
Archives
- June 2024
- May 2024
- March 2024
- January 2024
- June 2023
- May 2023
- April 2023
- March 2023
- February 2023
- January 2023
- December 2022
- November 2022
- October 2022
- September 2022
- August 2022
- July 2022
- June 2022
- May 2022
- March 2022
- February 2022
- January 2022
- December 2021
- November 2021
- October 2021
- September 2021
- August 2021
- July 2021
- June 2021
- May 2021
- April 2021
- March 2021
- February 2021
- January 2021
- December 2020
- November 2020
- October 2020
- September 2020
- August 2020
- July 2020
- June 2020
- May 2020
- April 2020
- March 2020
- February 2020
- January 2020
- December 2019
- November 2019
- October 2019
- September 2019
- August 2019
- July 2019
- June 2019
- May 2019

