How to Install a Vapor Barrier in a Crawl Space
When you are installing a crawl space vapor barrier, you need to follow a specific set of guidelines. With that in mind, let’s take a look at the step by step process that you should follow to ensure that the crawl space vapor barrier is put together correctly.
- Moisture is one of the most common things to worry about when it comes to crawl spaces. Small areas like this can be susceptible to damp and mold, and the last thing you want to think about is water coming into your crawl space. So, to get started, you need to add some perimeter drains to make sure that there will not be any water drainage to think about. You should ensure that your outside drains are done properly so that the water can move and drain out as needed without leaking into the crawl space.
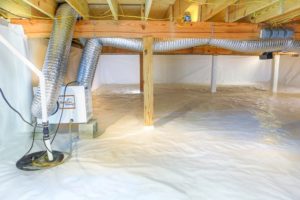
- Once you sort the drains, you need to ensure that the floor of your crawl space is completely cleaned. You should move all objects out of the way, especially if there any sharp objects in the dirt that won’t come out. If this is the case, you may need to think about 20 mil crawl space vapor barriers for coverage. The crawl space floor could be smooth, and if this is the case, you may only need a 12 mil size barrier.
- The one important thing that you need to remember is that you must overlap all seams when you are laying the barrier on the floor. Each seam must be taped down, and you should ensure that you are using the right tape – waterproof seam tape is your best bet here. The liner should be clean, and the seams should be taped individually to ensure the closest seal.
- It’s recommended that you always use insulation in your crawl space, especially for the foundation walls. Rigid foam is the best option as it soaks up less moisture compared to other types of insulation, and once it’s added, the 12 mil liner can be taped to the outside. Without the insulation, you could find it difficult to maintain the environment in your home without damp and mildew.
- There is a chance that before you moved in, your crawl space didn’t have much in the way of insulation, and if it did, it’s possible that it was not sealed correctly. If you have any concerns about the integrity of the insulation of the crawl space, you need to consider taking it all out and starting again while making sure that space is dry first. Then, insert all the new insulation and continue lining the crawl space.
- Lastly, you need to condition the air once the crawl space is sealed. There are so many ways that you can do this, but the most common is adding dehumidifiers to crawl space. However, you shouldn’t need to if you are adding a vapor barrier to your crawl space.
If you need any further help with your vapor barrier installation, please don’t hesitate to get in touch with Sedona Waterproofing Solutions today.