How Does Crawl Space Encapsulation Work? A Homeowner’s Guide to the Process
The space beneath your home might be out of sight, but it should never be out of mind. For many homeowners, the crawl space is a dark, damp, and neglected area. This can lead to significant problems, including mold growth, pest infestations, poor air quality, and structural damage. Crawl space encapsulation offers a comprehensive solution to transform this problematic zone into a clean, dry, and healthy part of your home.
This guide will walk you through the entire process of crawl space encapsulation. We will explore what it is, why it matters, the detailed steps involved, the materials used, and the costs you can expect. By understanding how encapsulation works, you can make an informed decision to protect your home and your family’s health.
What is Crawl Space Encapsulation?
Crawl space encapsulation is the process of completely sealing your crawl space from the outside elements. This involves lining the floor and walls with a heavy-duty, water-proof barrier, sealing all vents and openings, and often installing a dehumidifier to control moisture levels. The goal is to isolate the crawl space from the damp earth below and the humid air outside, creating a controlled environment.
Unlike a simple vapor barrier that might only cover the ground, a full encapsulation is a complete system. It addresses all sources of moisture, including ground vapor, wall leaks, and outside air. This comprehensive approach turns your once-soggy crawl space into a conditioned part of your home’s envelope, similar to a clean, dry basement.
The Key Benefits of Encapsulating Your Crawl Space
Investing in crawl space encapsulation provides numerous advantages that extend beyond just a dry foundation. These benefits impact your home’s health, your energy bills, and even its resale value.
Improved Indoor Air Quality
A surprising amount of the air you breathe inside your home originates from the crawl space. Through a “stack effect,” air from the lower levels is pulled up into your living areas. If your crawl space is damp and moldy, those contaminants, including mold spores, dust mites, and bacteria, are circulating throughout your house. This can trigger allergies, asthma, and other respiratory issues. Encapsulation seals off these pollutants, leading to significantly cleaner and healthier indoor air.
Prevents Mold and Mildew Growth
Mold and mildew thrive in dark, damp environments—the exact conditions found in most unsealed crawl spaces. These fungi not only produce musty odors but can also cause serious health problems and rot the wooden structures of your home. By eliminating the moisture source through encapsulation, you create an environment where mold cannot grow, protecting both your family’s health and your home’s structural integrity.
Increased Energy Efficiency
A vented, unconditioned crawl space can be a major source of energy loss. In the winter, cold air enters through the vents, cooling your floors and forcing your heating system to work harder. In the summer, hot, humid air raises the temperature and humidity inside your home, putting extra strain on your air conditioner. Encapsulation, combined with insulation, helps maintain a more stable temperature in the crawl space. This reduces the workload on your HVAC system, leading to lower energy bills year-round.
Deters Pests and Rodents
Damp, dark crawl spaces are an open invitation for pests like termites, cockroaches, spiders, and rodents. These critters seek out moisture and shelter. Encapsulation removes the damp environment they find so attractive. Sealing all gaps and openings also eliminates their entry points, making your home a much less appealing target for unwanted guests.
Protects Structural Integrity
Persistent moisture is the enemy of your home’s foundation. It can cause wooden support beams and floor joists to rot, weaken, and sag. Excess moisture can also lead to soil erosion under your foundation, causing settling and cracks. By keeping the crawl space dry, encapsulation prevents this costly and dangerous structural damage, preserving the long-term stability of your home.
The Step-by-Step Encapsulation Process
A professional crawl space encapsulation is a multi-stage project. Each step is crucial for creating a durable and effective barrier against moisture.
Step 1: Preliminary Inspection and Preparation
The process begins with a thorough inspection. A professional will assess the current state of your crawl space, identifying any existing issues like standing water, mold, wood rot, or pest infestations. They will take moisture readings and determine the best course of action.
Before any installation can begin, the area must be prepared. This involves removing any old, failing vapor barriers, debris, rocks, and sharp objects that could puncture the new liner. If there is standing water, it will be pumped out.
Step 2: Addressing Repairs and Mold Remediation
During the inspection, any damage to the foundation or wooden structures must be addressed. This could involve repairing foundation cracks or replacing rotted support posts and joists. It is critical to fix these structural issues before sealing the space.
If mold is present, it must be professionally remediated. This typically involves cleaning the affected surfaces with specialized antimicrobial solutions to kill existing mold and prevent its return. Simply covering up mold is not a solution; it must be completely removed.
Step 3: Installing a Drainage System (If Needed)
For crawl spaces with significant water intrusion problems, a drainage system may be necessary. This often includes installing a French drain around the interior perimeter of the crawl space foundation. The drain channels water to a low point, where a sump pump is installed. The sump pump then actively pumps the water out and away from your home, ensuring the area remains dry even during heavy rains.
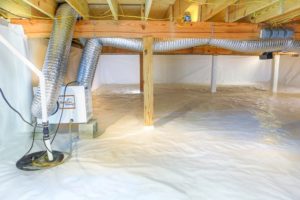
Step 4: Laying and Sealing the Vapor Barrier
This is the core of the encapsulation process. A thick, durable vapor barrier, typically made of reinforced polyethylene, is laid down to cover the entire crawl space floor. The liner extends up the foundation walls and around any support piers. The thickness can range from 12-mil to 20-mil, with 20-mil being the most puncture-resistant and durable option.
All seams of the liner are overlapped and sealed with special waterproof tape. The barrier is mechanically fastened to the foundation walls to create a complete, airtight seal. This prevents moisture vapor from the ground from entering the crawl space.
Step 5: Insulating the Foundation Walls
With the crawl space sealed from the ground, the next step is to insulate the foundation walls. Rigid foam board insulation is typically used for this purpose. It is resistant to moisture and provides a high R-value, helping to regulate the temperature within the crawl space. Insulating the walls, rather than the floor joists above, helps to condition the space and contributes to overall energy efficiency.
Step 6: Sealing Vents and Air Gaps
Traditional crawl spaces were built with vents to the outside, based on the outdated theory that this would allow moisture to dry out. We now know that these vents often do more harm than good, allowing humid summer air and cold winter air to enter. During encapsulation, these vents are sealed permanently from the inside with airtight covers and foam insulation. All other air leaks, such as gaps around pipes and wires, are also sealed with spray foam.
Step 7: Installing a Dehumidifier
The final step is to install a commercial-grade crawl space dehumidifier. Even in a fully sealed space, some moisture can remain. The dehumidifier actively removes this residual moisture from the air, maintaining a consistent, low humidity level (typically between 45-55%). This is the ultimate guarantee that the environment will remain dry and inhospitable to mold and pests. These units are self-draining, so you don’t have to worry about emptying them.
Crawl Space Encapsulation Costs
The cost of crawl space encapsulation can vary widely depending on several factors:
- Size of the Crawl Space: The larger the area, the more materials and labor will be required.
- Condition of the Crawl Space: A clean, dry space will be cheaper to encapsulate than one with standing water, mold, or structural damage that needs repair first.
- Materials Used: The thickness of the vapor barrier and the type of insulation will affect the price.
- Additional Services: The need for a sump pump, drainage system, or extensive mold remediation will add to the total cost.
On average, homeowners can expect to pay between $5 to $12 per square foot. For a typical 1,500-square-foot crawl space, this translates to a total cost of $7,500 to $18,000. While this is a significant investment, it is important to weigh it against the potential costs of foundation repair, mold remediation, and high energy bills that can result from a neglected crawl space.
Frequently Asked Questions about Crawl Space Encapsulation
1. Can I encapsulate my crawl space myself?
While it is technically possible for a skilled DIYer to undertake this project, it is generally not recommended. A professional installation ensures that all steps are done correctly, from proper seam sealing to correctly sizing and installing the dehumidifier. Mistakes can lead to trapped moisture, defeating the purpose of the project. Professionals also offer warranties on their work.
2. Is crawl space encapsulation worth the cost?
For most homeowners with vented, damp crawl spaces, the answer is a resounding yes. The long-term savings on energy bills, combined with the prevention of costly structural repairs and mold remediation, often provide a strong return on investment. Furthermore, the improvements to indoor air quality and overall home comfort are invaluable.
3. Will encapsulation get rid of the musty smell in my house?
Yes, in most cases. That musty smell is typically caused by mold and mildew growth in the damp crawl space. By eliminating moisture and remediating any existing mold, encapsulation removes the source of the odor. The result is a fresher, cleaner smell throughout your entire home.
4. How long does crawl space encapsulation last?
A professionally installed encapsulation system using high-quality materials is designed to last for the life of your home. The durable vapor barriers are resistant to tears and degradation. The key to longevity is annual maintenance, which usually involves a quick inspection of the system and servicing the dehumidifier to ensure everything is functioning correctly.
5. Do I still need insulation in my floor if I encapsulate my crawl space?
It depends on how the encapsulation is done. In a modern encapsulated system, insulation is typically installed on the foundation walls, not between the floor joists (the “ceiling” of the crawl space). This method brings the crawl space into the conditioned envelope of the home. If you have existing fiberglass batt insulation between the joists, it is often removed because it can absorb moisture and harbor mold. The rigid foam insulation on the walls becomes the primary thermal barrier.