Storm Aftercare: What to Do in the First 24 Hours of a Flooded Crawl Space or Basement
The first day after a flood sets the tone for recovery. Safety comes first, followed by smart, steady steps that protect your home’s structure and your health. The outline below keeps you focused while conditions are still changing.
Enter safely and control immediate risks
Turn off power at the main breaker if you can reach it without stepping in water. Never use wet electrical devices. If power is out, use flashlights instead of candles to reduce fire risk. Keep portable generators outdoors at least 20 feet from doors and windows to prevent carbon monoxide buildup. Install or check battery-powered CO alarms before you start cleanup.
Wear sturdy boots, gloves, eye protection, and an N95 or better when disturbing wet materials. Avoid contact with downed lines and any water touching them. Flood cleanup brings added hazards including electrical shock, heat stress, falls, and sharp debris, so pace the work and lift with help.
Stabilize the structure and drain water the right way
Do not rush to pump out a full basement. Begin only after outside floodwater has receded. Start by lowering the water about one foot, then wait overnight. If the level rises again, the soil is still saturated. When the water stops returning to your mark, remove two to three feet per day until empty. This slow approach helps protect walls and the foundation from pressure changes.
Check doors, floors, and masonry for movement as levels drop. If you see bowing walls, wide cracks, or stuck doors that were free before the flood, stop pumping and call a qualified pro.
Keep water moving away from the house
Clear exterior drains and downspouts so roof runoff does not re-enter. Open low wall or vent openings only if it is safe. Test your sump pump on a separate, dry circuit or with a generator placed outdoors. This is a good moment to note any sump pump maintenance needs for later follow-up.
Document everything and start your claim
Photograph standing water, structural surfaces, and contents room by room before you remove items. Capture appliance serial numbers and keep all repair receipts. Contact your insurer promptly and ask about any advance payment options while you begin safe cleanup.
Control health risks inside the house
Floodwater carries chemicals and sewage. Ventilate by opening doors and windows when conditions allow. Discard porous items that were soaked and cannot be fully cleaned and dried within 24 to 48 hours, including carpet and upholstery. That time window matters because mold can get established quickly. Use detergent and water first, and never mix bleach with ammonia or unknown chemicals.
Not sure which face covering to use while removing wet drywall or insulation? Choose an N95 or better and keep skin covered to reduce exposure to contaminated droplets and dust.
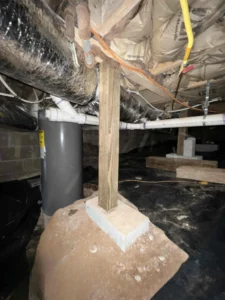
Crawl space specifics for day one
A flooded crawl space traps moisture under the living area. Once water levels outside drop and you can safely enter, remove standing water in stages as described above. Pull out soggy debris and any loose, saturated insulation that is falling. Improve airflow with temporary fans while you line up next steps like moisture control and crawl space encapsulation. These longer-term measures reduce vapor drive and help keep the area dry.
If you plan future vapor barrier installation, wait until the substrate is clean and dry. Many homes also benefit from a dehumidifier for crawl space use after bulk water removal. All of this works best with proper grading and drainage solutions that carry stormwater away from the foundation.
Protect your water supply
If you use a private well, switch to bottled water or boil water until testing confirms safety. Wells are not regulated and can be contaminated by floodwater. After disinfection, testing is usually performed 7 to 10 days later to confirm results. Contact your local health department or a certified lab for guidance on what to test.
8) Drying and removal priorities
Start with materials that trap moisture. That includes baseboards, wet drywall below the waterline, and saturated insulation. Move cleanable contents to a dry, ventilated area. Keep air moving and keep dehumidification running if power and conditions allow. If water reached ducts or air handlers, keep the HVAC off until inspected to avoid spreading contaminants. Mold remediation may be necessary when porous materials cannot be dried and cleaned promptly.
9) When to bring in specialists
Call licensed pros if you see structural movement, if fuel lines or appliances were submerged, or if you suspect electrical damage. Over the next weeks, plan permanent fixes that match the site. Foundation waterproofing and basement waterproofing address seepage through walls and slabs. Exterior grading and French drain installation can redirect surface and subsurface water. Some homes also need structural repair and updated crawl space insulation after prolonged saturation.
First-day checklist
- Power and gas made safe. CO alarms working. Generators outdoors.
- Begin staged pumping only after outside water drops. Monitor for movement.
- Photograph damage before removal. Contact insurance and save receipts.
- Ventilate, remove porous items that cannot dry within 24–48 hours. Don’t mix chemicals.
- Use safe water. If on a well, boil or use bottled water until tests confirm safety.
Recovery does not happen in a day, but day one decisions matter. Sedona Waterproofing can inspect, set up targeted drying, and plan long-term defenses that fit your site and soil. That includes thoughtful drainage solutions that keep stormwater moving away from the structure.